

What is a Trigger and How to Utilize It? Triggers in Google Apps Script are special functions that run automatically based on specific events or time schedules. These triggers help
What is a Trigger and How to Utilize It?
Triggers in Google Apps Script are special functions that run automatically based on specific events or time schedules. These triggers help you automate repetitive tasks and improve productivity in Google Workspace apps like Sheets, Docs, and Forms. Whether it’s editing a spreadsheet, submitting a form, or simply opening a document, Google Apps Script triggers can execute your custom scripts without manual effort. They play a crucial role in streamlining workflows and reducing time spent on routine tasks.
How to Use a Trigger?
Setting up Triggers in Google Apps Script is straightforward. You can automate workflows by choosing between simple or installable triggers depending on your requirements.
- Open Google Apps Script by navigating to Extensions > Apps Script in Google Sheets, Docs, or Forms.
- Write the function you want to trigger.
- Click on the Triggers (clock icon) in the left panel.
- Click + Add Trigger and select the function you created.
- Choose the event type (time-driven, onEdit, onFormSubmit, etc.).
- Configure additional options and click Save.
There are two main types of triggers:
- Simple Triggers – Quick and easy but with limitations.
- Installable Triggers – More powerful, requiring user authorization.
Simple triggers are automatically built-in but installable triggers need user authorization to use but it provide more functionality to the user.
If you have the knowledge of these triggers you can automate repetitive tasks, and save your time and efforts.
Simple vs. Installable Triggers in Google Apps Script
There are two core types of triggers in Google Apps Script: Simple triggers and Installable triggers.
Simple Triggers
Simple triggers in Google Apps Script are automatically active and do not require additional setup.. These are 3 most used simple trigger:
- onOpen() – Runs when a user opens a Google Sheet, Doc, or Form.
- onEdit() – Executes when a user edits a Google Sheet.
- onInstall() – Runs when an add-on is installed.
Example of a Simple Trigger:
function onOpen() {
  SpreadsheetApp.getUi().alert("Welcome! This sheet is now open.");
}
Limitations of Simple Triggers:
- Cannot access external services (e.g., Gmail, Drive)
- Cannot run longer than 30 seconds
- Cannot use user authentication
Installable Triggers
Installable triggers in Google Apps Script are more powerful and allow access to advanced services. These installable Google Apps Script triggers help in extending automation capabilities, especially when dealing with external services and email notifications.:
- Send emails
- Access external services
- Run for longer durations
Examples include:
- Time-driven triggers
- Form submission triggers
- Sheet edit triggers
Creating Time-Based Triggers
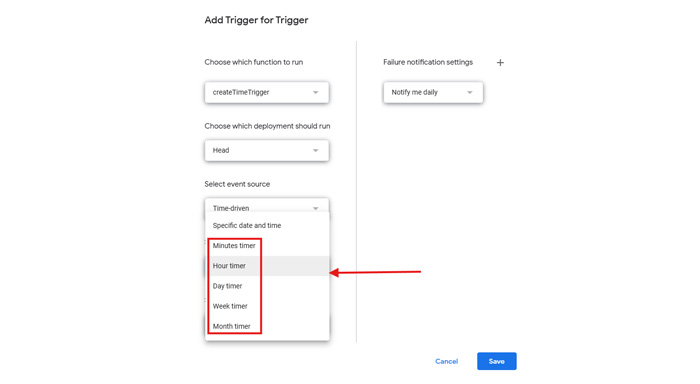
One of the most commonly used triggers in Google Apps Script is the time-based trigger. Time-based triggers execute scripts at predefined intervals. You can schedule them to run:
- Every minute, hour, or day
- At a specific date and time
- On a recurring weekly or monthly basis
Example: Running a Function Every Day at Midnight
function createTimeTrigger() {
ScriptApp.newTrigger("myFunction")
.timeBased()
.everyDays(1)
.atHour(0)
.create();
}
function myFunction() {
Logger.log("Daily task executed");
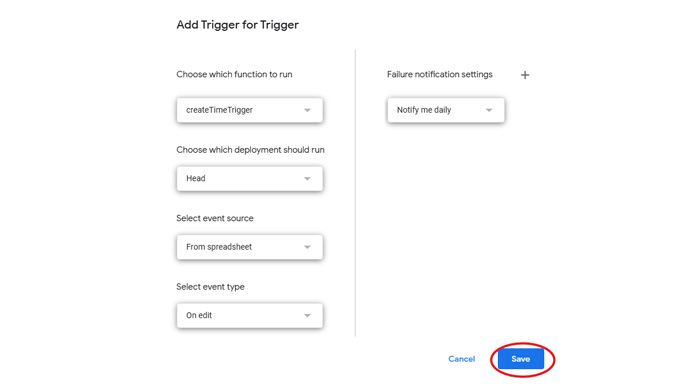
}Steps to Set Up a Time-Based Trigger:
- Open Google Apps Script
- Click Triggers (clock icon) in the left panel
- Click + Add Trigger
- Select the function, execution time, and frequency
- Click Save
Event-Driven Triggers for Sheets, Forms, and Docs
Another useful category of triggers in Google Apps Script is event-driven triggers, which respond to user actions like form submissions or sheet edits. These event-driven Google Apps Script triggers help automate tasks such as sending alerts or updating databases upon user interactions.
Triggers for Google Sheets
- onEdit(e): Runs when a user edits a cell.
- onChange(e): Runs when structure changes (inserting rows, deleting columns).
Example: Send an Email When a Sheet is Edited
function onEdit(e) {
MailApp.sendEmail("your-email@example.com", "Sheet Edited", "A change was made in the sheet.");
}
Triggers for Google Forms
- onFormSubmit(e): Runs when a user submits a form.
Example: Auto-Reply to Form Submission
function autoReply(e) {
var response = e.values;
var email = response[1]; // Assuming email is in the second column
MailApp.sendEmail(email, "Thank You!", "We received your response.");
}
Triggers for Google Docs
- onOpen(e): Runs when a document is opened.
Example: Auto-Insert Header on Open
function onOpen() {
var doc = DocumentApp.getActiveDocument();
var body = doc.getBody();
body.insertParagraph(0, "This document is auto-managed.");
}
Best Methods for Managing Triggers
When using Triggers in Google Apps Script, managing them properly ensures reliability and performance. Monitoring Google Apps Script triggers regularly helps prevent failure and improves script execution success rates.
- Use Logging for Debugging: Incorporate Logger.log("Message") to monitor whether the script is executed.
- Avoid Too Many Triggers: Excessively using the trigger can hamper the performance.
- Test Before Deploying: Before applying the trigger execute your script manually to ensure the functionality.
- Use Installable Triggers for Advanced Tasks: If your script need to use emails or external services, always use installable triggers.
- Monitor Trigger Failures: Monitor execution logs in Apps Script Dashboard to fix the issues.
Final Thought
In Google Apps script triggers are used to automate the recursive tasks so that efficiency can be increased. Two types of triggers are being used in the Google Apps script. Simple triggers and installable triggers. Simple triggers are user friendly but it has some restrictions, while using installable triggers provides more adaptability and control. In the installable triggers, you can apply time-based triggers or event-driven triggers depending on the requirement.
By applying these triggers you can improve the performance of teams and manage the workflow in Google Workspace.
Respond to this article with emojis